We will be constantly striving to maintain these standards and will work diligently to ensure that we meet or exceed our customer’s expectations. We feel confident that with this device you will feel more confident. Our goal in providing this system for upper body support is to decrease tension in the area and improve overall mood and physical well being. We know that the effectiveness of this device lies in its ability to use it effortlessly on a daily basis during any number of regular activities, providing constant support with minimal effort.
By allowing our customers to maintain the correct posture for gradually increased periods of time throughout each day, we know that whether the benefits are felt within the first few days, after a couple of months, or a few years, Bladeflex will be with you every step of the way.
Test Fitting Once you have read the manual and setup Bladeflex for the first time
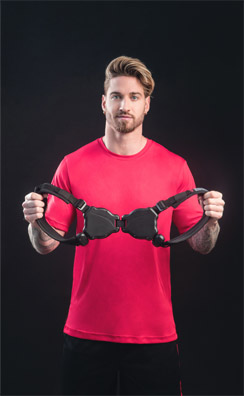
1
Hold the Bladeflex out in front of you with the size adjustment clips pointing up, the screws facing out, and the release buckle in your right hand.
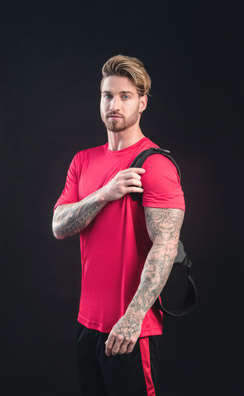
2
Place the padded strap in your right hand over your left shoulder so the release buckle is on your left shoulder.

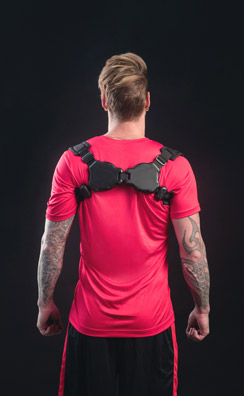
3
With the Bladeflex hanging off of your left shoulder, reach your right arm behind your back and place it through the free hanging loop. Stretch the padded strap over your right shoulder as if putting on a backpack.
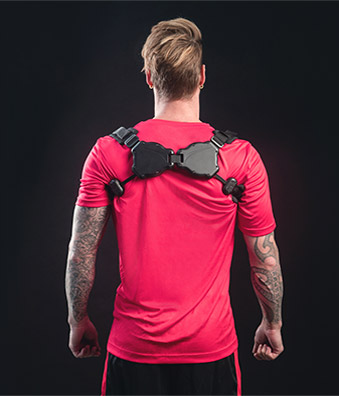
4
When the Bladeflex is adjusted to the proper size, ensure the torque clips are in contact with the blade disks.

Adjusting the Size
1
If Bladeflex is adjusted too tight, the torque adjusters will not be engaged with the body. Adjustable straps can be lengthened until desired size is achieved.
2
If Bladeflex is adjusted too loose it will not be providing adequate support. Shorten the adjustable straps until desired support is achieved.

4 Week Training System
The Bladeflex posture training system will re-train your muscle memory in 3 ways during a 4 week plan:
Stabilize
Week 1- By increasing the strength during the first week, Bladeflex will provide strong, stable support needed to initialize the transformation.
Mobilize
Week 2 – By reducing the strength and allowing movements, weeks 2 and 3 will target key muscle groups with specialized exercises.
Maximize
Week 3 – With the exercise band provided, additional strengthening will help maximize the long-term results.


Week 1 - Stabilize
Start your posture correction with a stabilizing week. By increasing training periods each day, you will gradually adapt your body to the strong, stable support of good posture. You will not be performing any movements during this stabilizing period. The purpose is to wear the Bladeflex set at a strength appropriate for your individual needs. Try stabilizing when eating, watching TV, reading, meditating, or performing other activities that require limited movement, whether standing or sitting.
(1) Set the strength on your Bladeflex to provide enough stabilizing force to support your upper body position as described below. (2) Wear the Bladeflex for your daily training period.
- Day 1 – 10 minutes
- Day 2 – 20 minutes
- Day 3 – 30 minutes
- Day 4 – 40 minutes
- Day 5 – 50 minutes
- Day 6 – 60 minutes
- Day 7 – Recovery/Day off
Adjusting the Strength
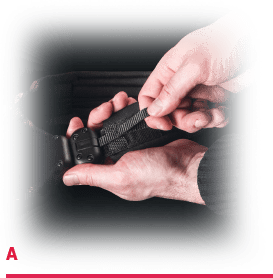
A) (1) While keeping the Bladeflex on a flat and stable surface, hold tightly onto one of the torque clips with one hand and pull out the torque strap from under the elastic strength guides with the other.
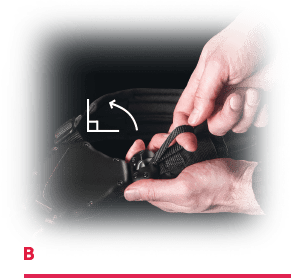
B) (2) With a firm grip, pull straight up on the torque strap, allowing the torque clip lid to open to a 90-degree angle. ! Always hold firm on the torque strap while the torque clip lid is open
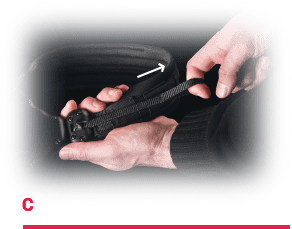
C) (3) Keeping the torque strap level with the padded strap, either pull straight out or allow the torque strap to retract to the desired strength.
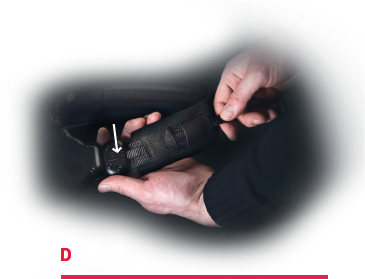
D) (4) Once you have reached the desired strength, use the thumb holding the torque clip to close the lid, locking the resistance in place. (5) Tuck the remaining torque strap under the elastic strength guides.
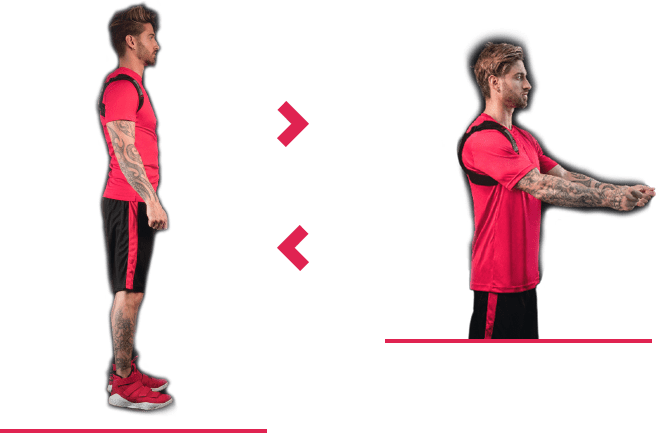
Week 2 - Mobilize
In Week 2, incorporating light movements into your training will initiate proper form. This week 2 exercise is a forward arm extension movement and can be performed while in a seated or standing position. Perform this movement slow and with purpose, feeling your back stretch during the forward movement and squeezing your shoulder blades on the return. Breathing out when reaching your arms forward and breathing in during the return will help release tension.
(1) Reduce the strength of the Bladeflex to allow comfortable movements by retracting the torque clips by small, equal increments until a desired strength is reached. (2) With your lower abdominal muscles engaged, reach forward with your arms extending from your mid-section. (3) When you reach your maximum extension, hold for a count of five. (4) Slowly, return your arms back to the starting position.
- Day 1 – 5 reps
- Day 2 – 10 reps
- Day 3 – 15 reps
- Day 4 – 2 sets of 10 reps
- Day 5 – 2 sets of 10 reps
- Day 6 – 3 sets of 10 reps
- Day 7 – Recovery/Day off
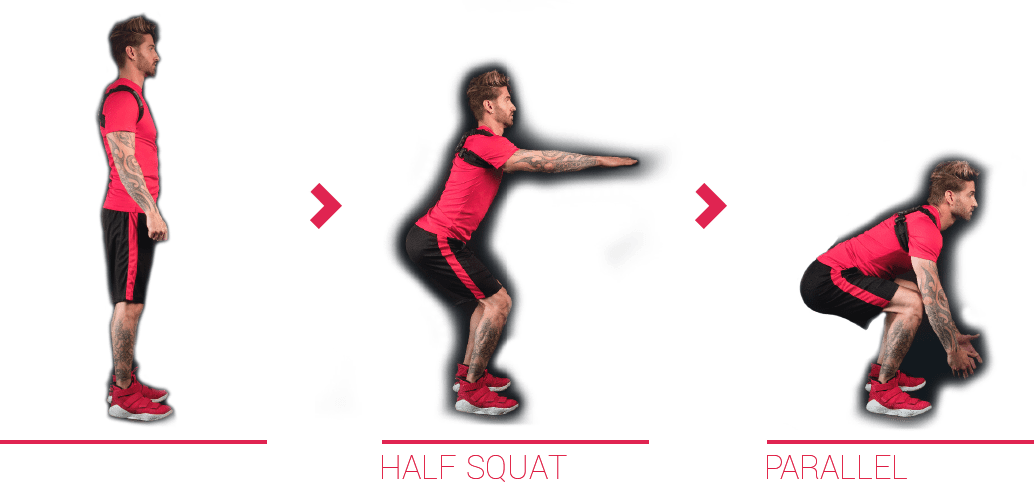
Week 3 - Mobilize - Advanced
In week 3, you will be performing more dynamic movements. Incorporating squat movements will help strengthen and stabilize your core, while helping you improve your upper back strength. On the second half of the week, try a deeper squat where your thighs become parallel with the floor and you are able to touch the ground. If you cannot maintain proper form while touching the ground, go only as far as you can. Perform both exercises slowly with controlled movements.
(1) Start with your arms down by your side, your feet firmly planted shoulder width apart, and facing forward. (2) Bend your legs while raising your arms up and forward, allowing your torso to hinge forward at your hips. (3) Once your legs are at a 90-degree angle with your knees over your toes, return to the starting position.
Half Squat
- Day 1 – 5 reps
- Day 2 – 10 reps
- Day 3 – 15 reps
Parallel
- Day 4 – 2 sets of 10 reps
- Day 5 – 2 sets of 10 reps
- Day 6 – 3 sets of 10 reps
- Day 7 – Recovery/Day off
Week 4 - Maximize
In Week 4, incorporating band exercises with the band provided will help maximize your training experience. These exercises will provide additional strengthening to targeted muscles associated with posture. The band will provide an increased resistance to what you have performed in Weeks 2 and 3, maximizing the benefit. These two exercises can be completed with or without wearing the Bladeflex.
Rotator Cuff
- Day 1 – 10 reps
- Day 2 – 15 reps
- Day 3 – 2 sets of 10 reps
Rows
- Day 4 – 10 reps
- Day 5 – 15 reps
- Day 6 – 2 sets of 10 reps
- Day 7 – Recovery/Day off
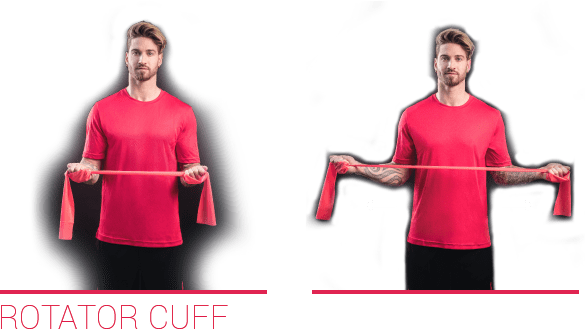
(1) Wrap the band around your hands with palms facing up and arms bent at 90 degree angles. (2) Rotate your hands out while keeping your elbows close to your body. (3) Hold that extension for 3–5 seconds, focusing on squeezing your shoulder blades. (4) Return slowly to center.
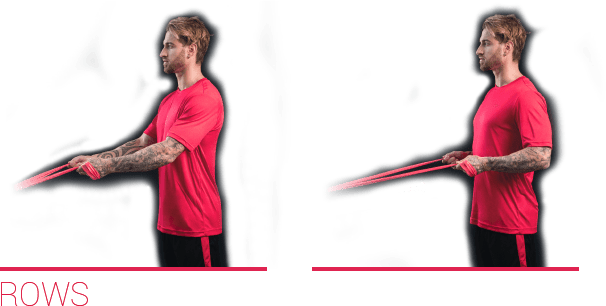
(1) Wrap the band around a secure object or knob of a closed door. (2) Stand far enough back so there is tension in the band when your arms are extended forward. (3) Pull the band towards your body until your arms reach a 90-degree angle. (4) Hold that extension for 3–5 seconds, focusing on squeezing your shoulder blades. (5) Return slowly to center.
Congratulations
You have now completed the 4-week posture training program! Incorporating the Bladeflex into your daily routine after this 4-week guide will be important to balance out the constant stresses that are put on your posture daily.